
The Wedding of Taylor & David
- Nicholas Ahn
- Mar 2, 2023
- 7 min read
Bit of a different blog this time. I typically write about travel film photography. However, I couldn't resist writing up this unique blog for a unique wedding I shot on film. I don't shoot a ton of weddings for a variety of reasons, but when Taylor approached me about using film to capture her wedding, I couldn't pass up the opportunity.

Taylor reached out to me in late 2022 to discuss what she wanted, and we went back and forth for a bit to lock down how her wedding was going to be captured. Her wedding was split into two events: the ceremony at the Rothko Chapel with family photos and wedding party photos, and then the reception at the Montrose Center later in the evening. We decided to use digital photography for both events but to add a couple rolls of film for the reception.
Let me also take a moment to say that Taylor is the bride every photographer dreams of being hired by. She is so articulate, organized, with unmatched communication skills, and most of all, very clear and defined with her vision. I absolutely loved working with her. We had a Zoom call to go over the day and the shot list. Taylor had a whole PowerPoint presentation prepared with the names of the family, groom's party, bridal party, all the combinations of family and friends, mood boards, photo inspo, everything you could think of. I have never had a client put that amount of effort into their vision, and it was incredibly helpful to me as a photographer.
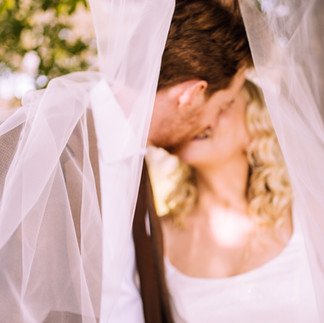
It's probably getting annoying how much I'm repeating myself but I am truly passionate about the character in film photography (which is why I do it despite the insane price hikes of film as of late). I think using film for your wedding is such a great idea. Every frame feels like you are peering into a memory and looking back on these photos decades in the future will be that much more special because of it. However, film can be risky and you don't want to risk the small chance that something happens during development or your 20 year old camera decides to crap out on you during the event. This is why I recommended having digital photos along with the film as a back up and for those family members who care more about a high resolution, crispy image to print rather than the look of genuine film.

Let's talk a bit about the prep work and equipment I planned to use for the wedding. I knew I'd need at least two film cameras: a point and shoot and an SLR. I decided on my trusty Konica Big Mini 302 and Minolta X700, respectively. I have used these cameras so many times that I know them like the back of my hand. Perhaps more importantly, I trust them to operate smoothly for such an high stakes event.

I also knew I would need a speedlight for this event. Wedding receptions are typically a bit dark with lots of movement so a flash is necessary to freeze action (like dancing). The speedlight for my digital camera is easy. It has a function on it called TTL (through the lens). This function is amazing. The speedlight talks to the camera and takes all the camera's exposure data (shutter speed, aperture, and ISO) as well as the focusing distance to determine the power of the flash and automatically exposes the image perfectly without any manual input. However, this wouldn't work with my film cameras. I had another speedlight but had to practice how to expose images correctly manually.
This is a much more difficult task than meets the eye. There are many factors that goes into using flash: the exposure of your camera, the distance to your subject, the ambient light in the room, the amount of walls and surfaces light will bounce off of, and the style of how you want the flash to light your image. With so many variables, there is no exact, correct way to use a speedlight. On top of all of this, I was using film. This meant I wouldn't know if I exposed the image correctly until I developed the film, and at that point if I got it wrong, there's no fixing it.
I'm a big believer in setting myself up for success. For this scenario, this meant being as prepared and as comfortable as possible with using flash with film. Prior to the wedding day, I used my digital camera to take some baseline datapoints for what the flash settings should be in various situations. I tried close up shots, wide shots, high shutter speeds, large apertures, small apertures, basically any situation I thought could arise at the wedding. I was taking notes on what settings I used for each situation and practiced taking photos of my wife just around the house.
Once I felt comfortable with being able to select the correct settings, I wanted to test it in a "real world" application. Something low stakes but on actual film to see if the results would be what I expected. I loaded up a cheap roll of film and took my camera and flash out to a group I play volleyball with every Sunday. I asked if I could snap some photos while they played. Given all that I had practiced, I felt pretty confident.
When I opened up my developing tank to see the freshly developed roll, my heart dropped... I couldn't see a single image on the roll. I scanned the roll to be sure, and it turns out I had severely underexposed everything. I realized that all those mental measurements I had in my head from all my practice was for an indoor setting. Light can bounce off of the ceiling and walls to meet your subject indoors adding additional light layering. On an outdoor sand volleyball court, the light will scatter off into the sky quickly so you need much more light. I tried pumping up the exposure as much as I could to get something but these shots are unusable.

As much as this was a failure, every failure is a teaching moment. I understood more about flash and film even though the images from volleyball didn't work. I would have liked to practice some more with some indoor settings but my time was up. It was showtime.
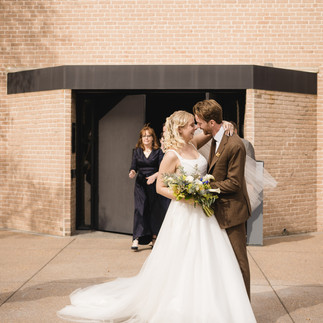
I arrived early to scope out the area as well as grab some images of the bride and groom emerging from the chapel. I walked around and took lots of candids of the couple making their rounds greeting guests and chatting. After most of the guests left, I went on to take some family photos and bridal / groom's party photos in the nearby park. The swing and low tree branch made for a perfect setting. I think they really fit the vibe of the couple and their friends. Everyone was so enthusiastic and happy that the photos basically took themselves. Although these images are not film, I wanted to share some of my favorite digital images from the Rothko Chapel:


Alright. Now onto the film. This was my game plan: I would have my Sony a7iii and Minolta strapped to my person and my Konica (point and shoot) in my pocket. I was hoping to get away with not needing to use flash with my Minolta. Instead, I would push the roll 2 stops. Pushing film means to expose the roll with less light and during development, leave it in the chemicals for a longer period of time to bring out more detail. The trade off is more film grain but I was using a professional grade film called Portra 400 which could handle 2 stops of pushing. The Konica would have automatic flash (since it's a point and shoot) and my Minolta would have no flash for both styles of images.
I started snapping some images with my Minolta to test my plan of no flash and pushing. I felt I had just enough light to make it happen and was feeling pretty good. I was taking photos with all three cameras to ensure I captured each of the different styles: pushed film, point and shoot with flash, and digital. Here are some of the film images from the beginning of the reception.


Once the toasts began, the lights got very dark. Suddenly, my Minolta with the pushed film wasn't going to work anymore, so I decided to double down on my Konica. I ended up putting another bonus roll through it to ensure I would come away with worthy images.


One of my favorite images with the Minolta is this dark image of Taylor and David's first dance. I love the twist in Taylor's dress and the soft smile on David's face. The golden background light gives a warm tone to the entire image. The out of focus audience also gives this image a quiet respect as well. I think this is a good example of how a flash would have ruined the aura of this image. Sometimes, accepting the shadows and underexposing by a stop or two is a worthy trade off to capture the authentic mood of an image. The deep shadows around the edges make me feel like I am in the audience witnessing an intimate moment.

It was time to open the dance floor for everyone. Here are some of my favorite digital images to act as comparison to the film images:


I leaned very heavily on my Konica for the dancing images. With such low light, even being able to manually focus through a viewfinder was a challenge. The autofocusing of a point and shoot camera was a very welcome feature. On top of the autofocusing, the built in flash was also one more thing I didn't have to worry about. Everyone had such a fun time. It was such a lively party.


Finally, when I had finished both rolls of film through the Konica, I had about half the roll left in my Minolta. It was too dark to use without a flash so I decided to just trust my practice and intuition and use the manual speedlight with it. It felt like a true test of my photography knowledge and skills. I double checked all my settings and went entirely off feel for the flash settings. Here are some images of the Minolta with the flash. I was very happy with how these turned out. There wouldn't have been any chance I could have come away with these images if I didn't practice and get a firm understanding of how to use a manual flash with film. I absolutely adore how Taylor was captured in these. Just pure bliss.


I set out with the goal of using film photography to capture the raw and authentic feel of Taylor and David's wedding. I think it was the perfect medium to showcase the joy and love of their reception. Congrats guys! It was truly an amazing day and I'm honored to have had the privilege to capture it.


Comments